This article will help you manage the profile of employees who have resigned, have been terminated, or who are no longer connected with the company. This article will also help you manage employees who are on leave for a specific period (e.g. Maternity Leave).
Deleting an employee is not allowed by the system, however, you can set the employee’s status from Active to 3 other statuses: Pending Separation, Suspended, and lastly, Separated/Terminated.
The process is done by HR or Admin who have access to employee details with the correct system permissions.
In this article, you will learn how to:
- Set an employee’s status from Active to Pending Separation, Suspended, and Separated/Terminated.
- Set a separation date on the employee’s schedules.
- Set a separation date on the employee’s enrollments.
- Set a separation date on the employee’s KeyRings.
All these steps are necessary when separating/terminating employee profiles on the system.
How to Set an Employee’s Status from Active to Pending Separation, Suspended, and Separated/Terminated
To change the employee status from Active to the 3 statuses (Pending Separation, Suspended, and Separated/Terminated), we use the Transition Wizard.
Steps:
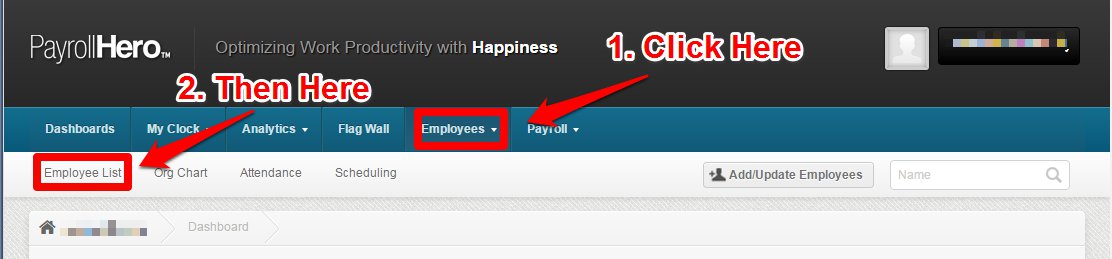
1. On your dashboard, click the Employees tab, then the Employee List.
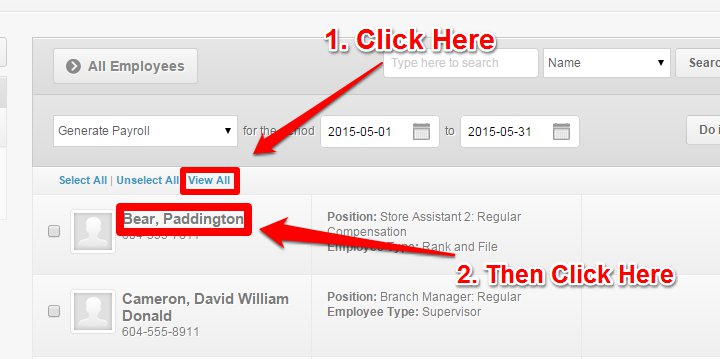
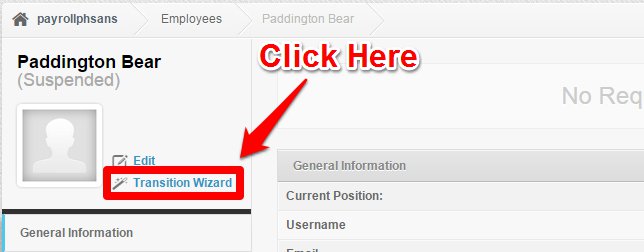
2. Click View All to make sure you see all your employees. Then click on the employee profile you’d like to change the status for. In this example, we have Paddington Bear.
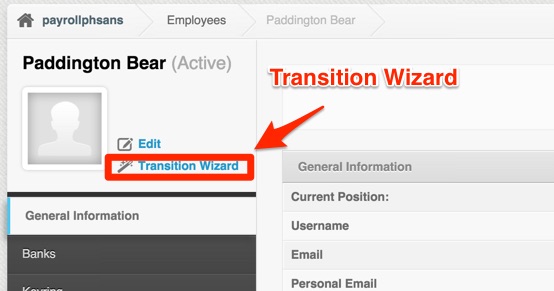
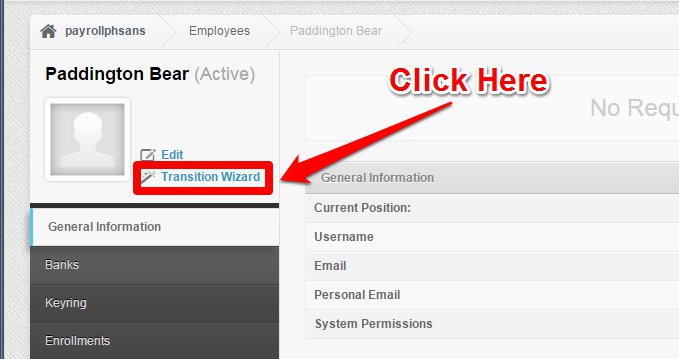
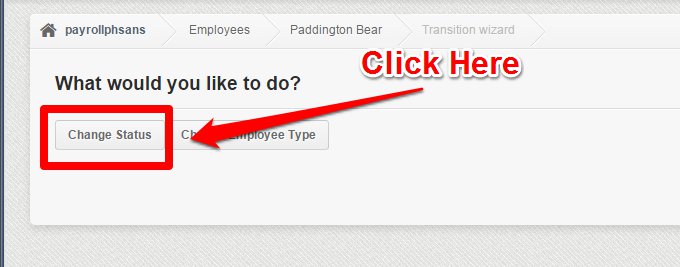
3. Click the Transition Wizard.
4. Click Change Status.
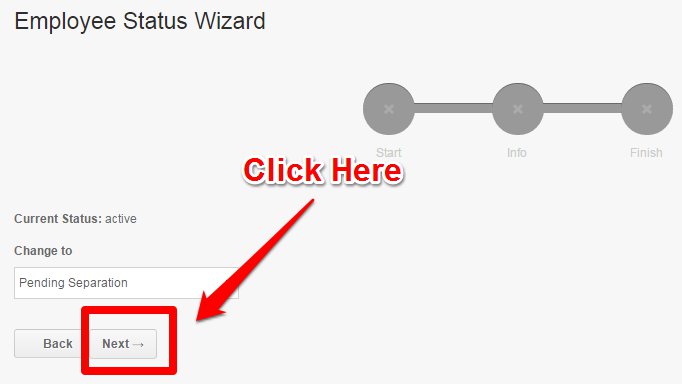
4.1 Pending Separation – This is the first of 3 status changes. The dropdown is automatically set to Pending Separation. Click Next.
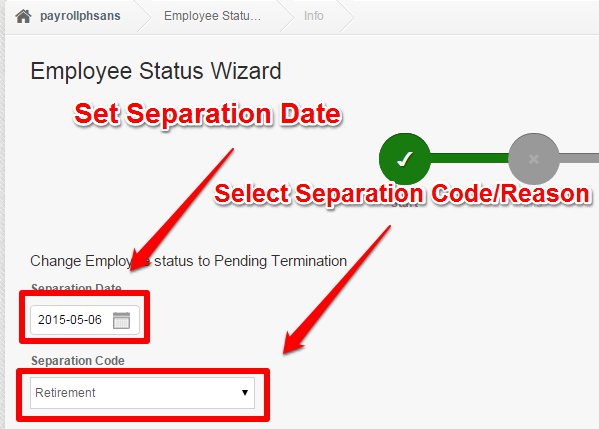
Set the Separation Date and select a Separation Code or reason for the pending separation (e.g. Retirement).
Click Update.
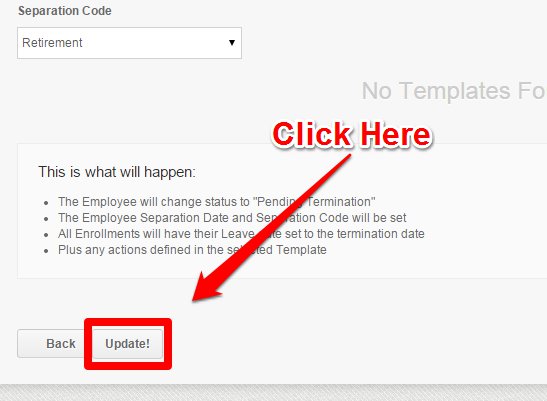
When you click Update, this is what happens:
– The event will be logged.
– The employee’s status will be set to Pending Separation.
-The employee Separation Date and Separation Code will be set.
– All enrollments will have their Leave date set to the separation date.
– Plus any actions defined in the selected Template (if any).
– The employee can still log in to his/her PayrollHero account but can no longer clock in or out as the schedules have already ended.
– His or her payroll can still be generated.
– The employee will no longer show on the Active Employees category/filter on the employee list.
– They will however show on the Pending Separation and All Employees categories/filters on the employee list.
After updating, you are now back to the employee’s company profile. You can stop here if the effects listed above are your purpose for the employee. If not, you can move on to the next step.
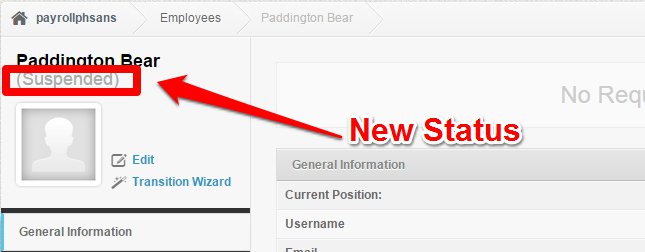
4.2 Suspended – This is the second of 3 status changes. This status is for employees who will be on leave for only a certain period (e.g. Maternity Leave). You can visit this separate Knowledge Base article for more details.
To do this, simply click on the Transition Wizard on the employee’s company profile again.

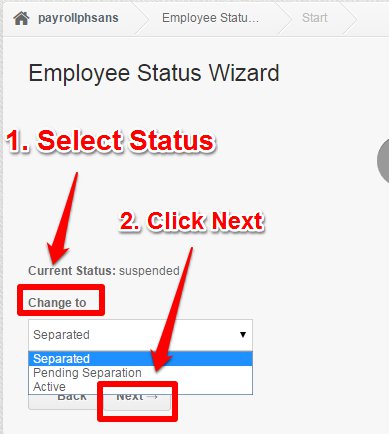
Click Change Status.
Select Suspended to continue the process or you can select Active if you decide to put the employee back to Active status. In this example, we will choose Suspended to continue the process.
Click Next.
You’ll see a reminder to terminate assigned Keyrings to the employee. Remember to set the employee’s separation date on the Keyrings, Schedules, and Enrollments pages of the employee.
Click Update.
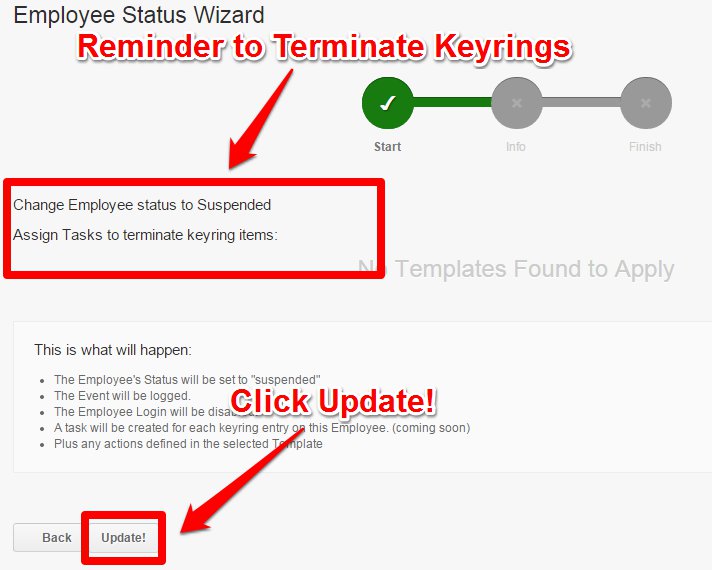
When you click Update, this is what happens:
– The event will be logged.
– The employee’s status will be set to Suspended.
– Plus any actions defined in the selected Template (if any).
– The employee can no longer log in to his/her PayrollHero account.
– The employee can no longer clock in or clock out (same with “Pending Separation” status).
– His or her payroll can no longer be generated.
– The employee will no longer show on the Active Employees category/filter on the employee list.
– They will however show on the Suspended and All Employees categories/filters on the employee list.
After updating, you are now back to the employee’s company profile with the status set to Suspended.

4.3 Separated/Terminated – This is the third of 3 status changes. To do this, simply click on the Transition Wizard on the employee’s company profile again.
Click Change Status.
Select Separated/Terminated to continue the process or you can select Suspended if you decide to put the employee back to Suspended status. In this example, we will choose Separated/Terminated to continue the process.
Click Next.
Click Update.
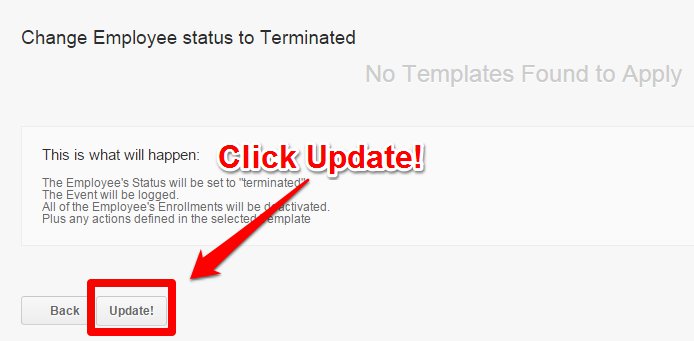
When you click Update, this is what happens:
– The event will be logged.
– The employee’s status will be set to Separated/Terminated.
– Plus any actions defined in the selected Template (if any).
– The employee can no longer log in to his/her PayrollHero account (same with Suspended status).
– The employee can no longer clock in or clock out (same with Pending Separation and Suspended statuses).
– All of the Employee’s Enrollments (payments) will be deactivated.
– His or her payroll can no longer be generated.
– The employee will no longer show on the Active Employees category/filter on the employee list.
– They will however show on the Separated/Terminated and All Employees categories/filters on the employee list.
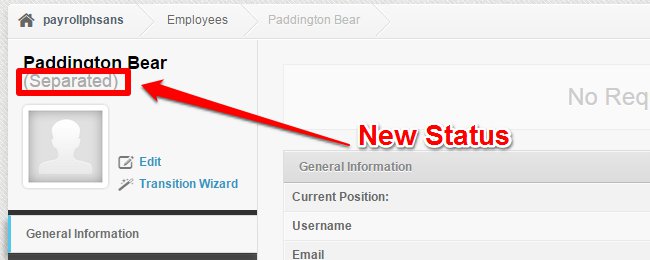
After updating, you are now back to the employee’s company profile with the status set to Separated/Terminated..
Please note that when changing the employee’s status back to Active via the Transition Wizard, you cannot skip statuses. You will need to change from Separated/Terminated to Suspended, then Suspended to Pending Separation, then Pending Separation back to Active.
And that’s it!
The following articles will show you how to update settings for Separated/Terminated employees. Aside from the employee status change explained above, you will need to do the following when an employee has resigned or has been separated/terminated in the system.
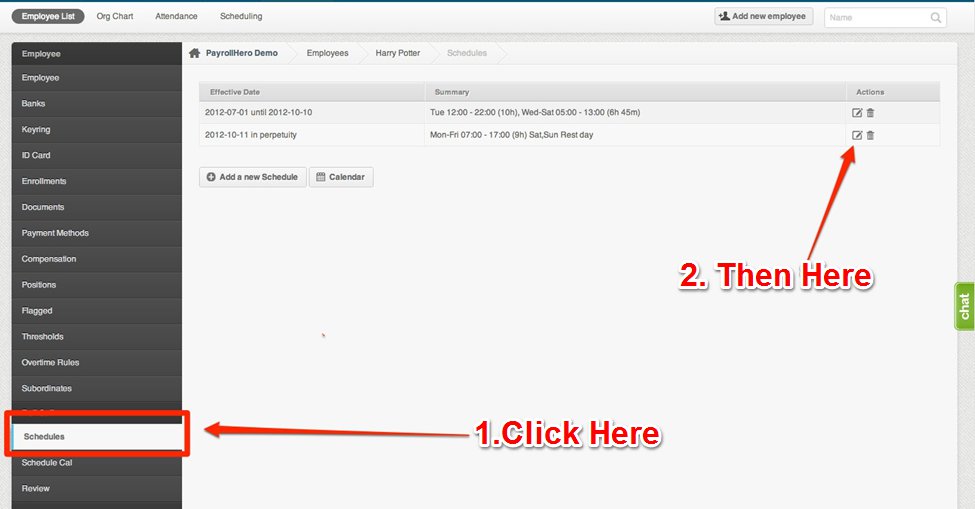
How to Set a Separation Date on the Employee’s Schedule?
Setting a separation date is needed so that payroll will no longer be generated for the specific employee.
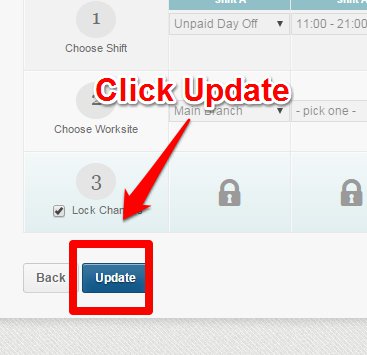
To set a separation date, go to the employee’s Schedules page and click Edit.
Set an end date.
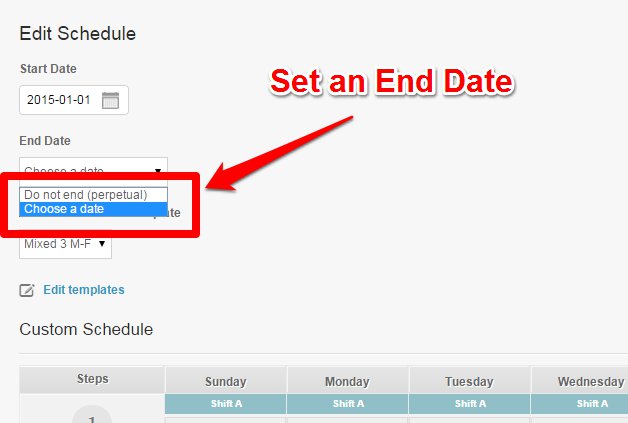
Click Update.
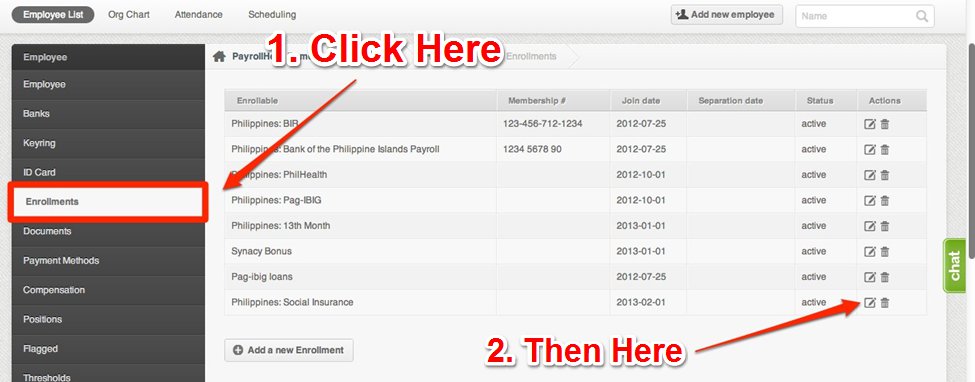
How to Set up a Separation Date on the Employee’s Enrollments?
Go to the employee’s profile and click on Enrolments, then click the edit icon.
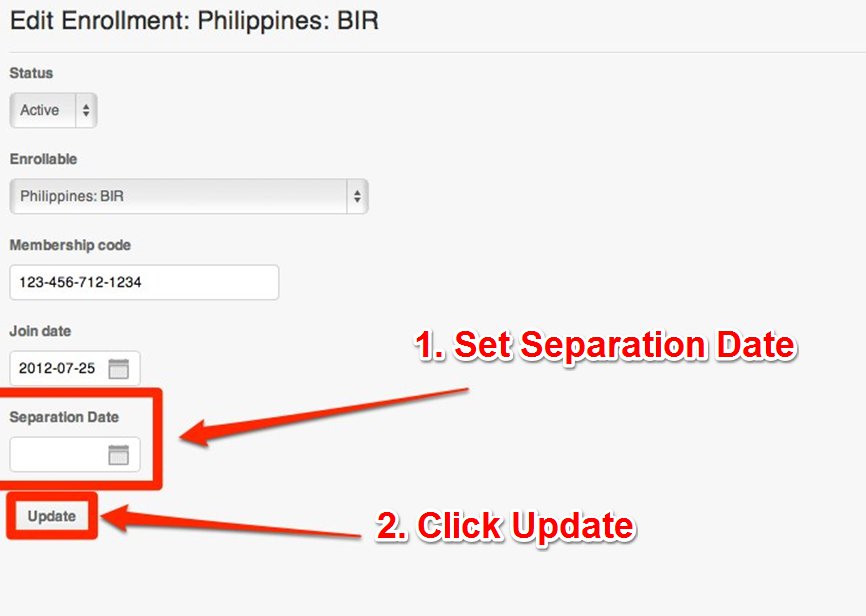
Set the separation date and click Update.
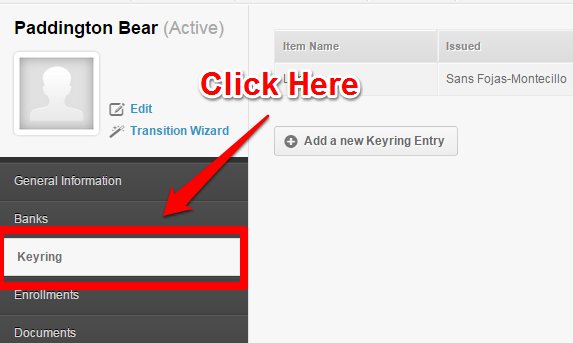
How to Revoke an Employee’s Keyring Items?
On the employee’s profile, click Keyring.
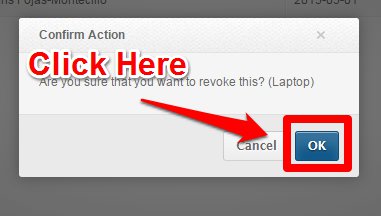
Click the Revoke icon for the specific item.

Click Ok.
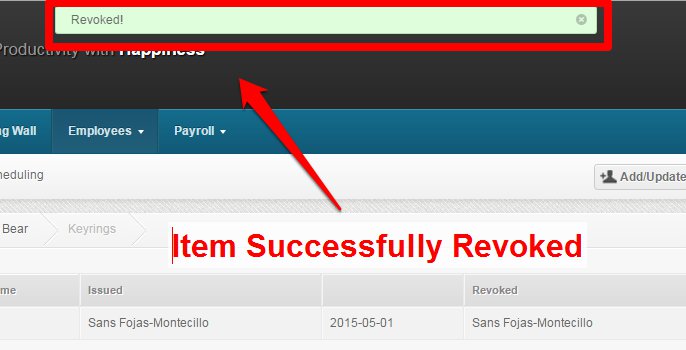
A notification will say that the item has been successfully revoked.
You have just learned how to manage a resigned or separated/terminated employee!
That concludes the ‘How To Manage Employee Statuses (Separated/Terminated, On Long Leave or Suspended)’. You should now be able to manage employee statuses, confidently.
If you have any further questions, please send us a message on our requests page at support@payrollhero.com – we’d be happy to help.